piNOS Audio System
The first project which I bring to you is the piNOS audio system. It is a kind of clone to a popular audiosystem which allows you to have audio all over your home and even synchronise it. The system comprises of a master device (including a media server) and satellites which function as mere audio players. And - as everything is APP nowadays - the whole thing of course controls through your mobile device.
Inhalt
- System description
- Hardware used/ Bill of material
- Preparing Linux (Rasbian Wheezy)
- Installing and setting up WLAN
- Installing and setting up (USB)-Audio adapter
- Installing Logitech Media Server
- Installing and setting up Squeezelite player
- Controlling the audio system
- Implementation prototype
- Implementation: Doing the piNOS system
- The piNOS Master
- The piNOS Satellite
System description ↑
A picture says more than a thousand words can do...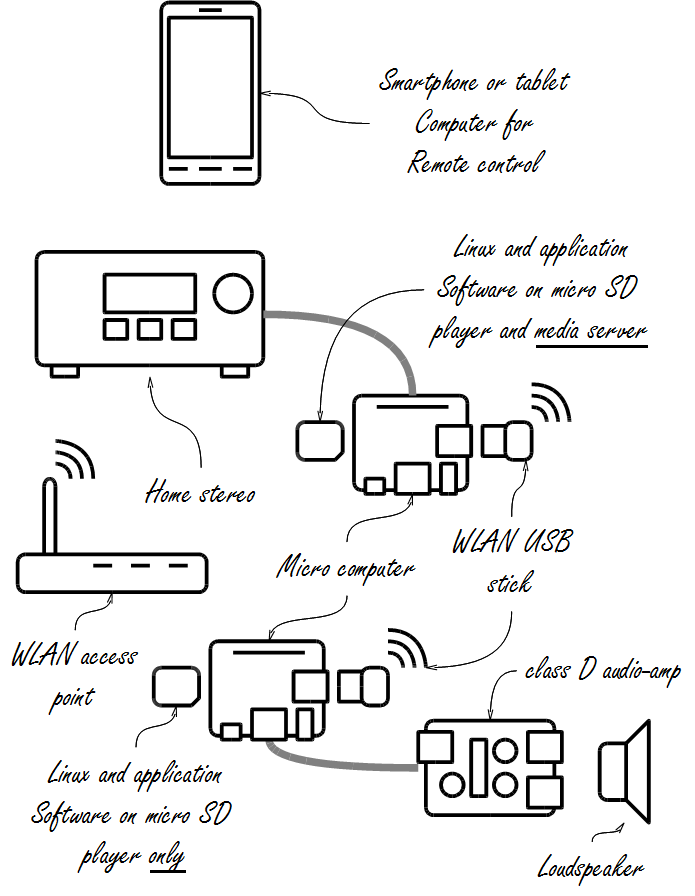
You might also like to check out the corresponding "Class D Amplifier" project for creating the class D audio amplifier shown in the lower right corner of the above image.
Hardware used/ Bill of material ↑
I used the following hardware during the prototype phase (for later implementation some hardware/ software componentens may change - I'll highlight that):- Raspberry Pi Model A+ (as from teh raspberrypi.org, "Raspberry Pi is a trademark of the Raspberry Pi Foundation")
- WLAN USB Adapter, LOGILINK WL0084B (based Ralink RT5370 chip)
- minimum 1A, 5V power adapter with micor USB (e.g. ANSMANN 1000-0005)
- micro SD memory card, minimum 4GB, class 10
only for initial setup and WLAN config:
- USB hub
- USB keyboard
- computer monitor with DVI/HDMI or TV with HDMI interface
You can buy the stuff here:
- http://www.conrad.de, price on upper end of the scale, reliable quality
- http://www.reichelt.de, quick delivery, reasonably priced, reliable quality
- http://www.pollin.de, quick delivery, reasonably priced, quality questionable, documentation weak
If you will use your product headless (meaning not using a displaying device you might be ok with the integrated audio adapter. This is however not necessarily HiFi quality. In that case you should consider adding extra hardware, a USB audio already gives a difference.
Preparing Linux (Rasbian Wheezy) ↑
From a windows machine (that is what I'm used to use primarily):1. use win32diskimager to copy the wheezy image to your SD memory card
2. setting up the pi-hardware
- attach USB hub, connect WLAN USB stick and keyboard
- attach SD card to SD socket
- connect HDMI cable to monitor or TV screen
- power up
3. the pi starts with the config menu
- use the keyboard cursers (up, down, left, right) and tab key for navigation
4. expand the filesystem to use all SD card memory
- select item 1 and hit enter, follow the on-screen process
5. go for internationalisation (befor changing the password!)
- select item 4 and hit enter
- select I2 to adjust time zone, follow the on-screen process, stay patient, some steps have latency
- select I3 to adjust your keyboard, follow the on-screen process, stay patient, some steps have latency
6. boot to console
- select item 3 and hit enter
- enable/ confirm the usage of "Console" (hit tab and confirm "ok")
7. for future administration, we want to use SSH, hence enable SSH
- select item 8 and hit enter
- select A4 and hit enter
- confirm enabling SSH and hit ok
8. adjust password of user "pi" [optional]
Please ensure a proper keyboard setting prior to changing the password (see above)
- select item 2 and hit enter
- follow the on-screen messages, enter new password, re-enter password and
confirm
If you forgot to change the password and went for a reboot, the default settings of your pi are:
username "pi"
password "raspberry"
username "pi"
password "raspberry"
9. quit the config and reboot
- when leaving the config by stepping to "finish" (use the tab key) confirm to run the reboot
AUX
* to re-enter this config menu later simply enter
sudo raspi-config
Installing and setting up WLAN ↑
NOTE you'll be needing a keyboard and a monitor to carry out the WLANconfiguration
1. list your USB devices and see for your WLAN adapter
lsusb
for a list of supported WLAN devices check this: https://help.ubuntu.com/community/WifiDocs/WirelessCardsSupported#By_Manufacturer
2. based on the above reference list check, if driver is alread available (and maybe already started)
lsmod
3. if driver is not present, see below for next steps else continue to setup WLAN and check for networks
(assuming, that there is only one WLAN-stick present in the system)
iwlist wlan0 scan
If above command shows network(s) your WLAN-adapter is most likely going to work
4. adjusting wpa supplicant settings
sudo nano /etc/wpa_supplicant/wpa_supplicant.conf
the file should contain something like this (for a WPA2 WLAN):
ctrl_interface=/var/run/wpa_supplicant GROUP=netdev
update_config=1
network={
ssid="your network ID in quote marks"
proto=RSN
key_mgmt=WPA-PSK
scan_ssid=1
pairwise=CCMP
group=TKIP
psk="your network password in quote marks"
}
update_config=1
network={
ssid="your network ID in quote marks"
proto=RSN
key_mgmt=WPA-PSK
scan_ssid=1
pairwise=CCMP
group=TKIP
psk="your network password in quote marks"
}
For further reading and some hints on settings and options refer to http://wiki.ubuntuusers.de/WLAN/wpa_supplicant; mind the spelling and syntax of the network={}-section.
Once in a while, leaving out the pairwise and group properties is a good starting point; for WPA secured netwerks set proto to WPA; pairwise and group values can be determined by identifying ones network from step 3 above.
Once in a while, leaving out the pairwise and group properties is a good starting point; for WPA secured netwerks set proto to WPA; pairwise and group values can be determined by identifying ones network from step 3 above.
5. adjusting network settings
sudo nano /etc/network/interfaces
the file should contain something like this to ensure support for multiple WLANs (if that is applicable to you):
auto lo
iface lo inet loopback
iface eth0 inet dhcp
auto wlan0
allow-hotplug wlan0
iface wlan0 inet manual
wpa-roam /etc/wpa_supplicant/wpa_supplicant.conf
iface default inet dhcp
iface lo inet loopback
iface eth0 inet dhcp
auto wlan0
allow-hotplug wlan0
iface wlan0 inet manual
wpa-roam /etc/wpa_supplicant/wpa_supplicant.conf
iface default inet dhcp
It might be necessary once in a while to disable the power management of the WLAN stick: add a row to the above as
wireless-power off
6. restart the network environment without doing a reboot
sudo invoke-rc.d networking stop && sudo invoke-rc.d networking start
7. check your succesful config; shows connectivity to your network - SSID
iwconfig
8. you can now access your pi through SSH (e.g. putty) via WLAN, the IP address
is shown by
ifconfig
9. ensure automatic reconnection upon WLAN losses (when ethernet is not needed)
sudo mv /etc/ifplugd/action.d/ifupdown /etc/ifplugd/action.d/ifupdown.back
sudo cp /etc/wpa_supplicant/ifupdown.sh /etc/ifplugd/action.d/ifupdown
sudo cp /etc/wpa_supplicant/ifupdown.sh /etc/ifplugd/action.d/ifupdown
to revert (e.g. when using ethernet again)
sudo rm /etc/ifplugd/action.d/ifupdown
sudo mv /etc/ifplugd/action.d/ifupdown.back /etc/ifplugd/action.d/ifupdown
sudo mv /etc/ifplugd/action.d/ifupdown.back /etc/ifplugd/action.d/ifupdown
AUX
* in case lsusb returns a driver name and the driver is not yet installed
apt-cache search <dirvername>
if found, install the driver
sudo apt-get install <dirvername>
Installing and setting up (USB)-Audio adapter ↑
AUX* controlling the audio output level
sudo alsamixer
Installing Logitech Media Server ↑
This turtorial is based on http://allthingspi.webspace.virginmedia.com/lms.php and has been adjusted to match with current developmentsWith a rasbian wheezy dating to december 2014 (from the raspberrypi.org website), there are a couple of differences to the above tutorials, particularly when it comes to using squeezelite instead of squeezeslave
1. setup wlan according to description; check, that automatic wlan reconnect is enabled
2. run update
sudo apt-get update
sudo apt-get upgrade
sudo apt-get dist-upgrade
sudo apt-get upgrade
sudo apt-get dist-upgrade
3. add some libraries => not necessary when using wheezy release 2014 or later
sudo apt-get install libjpeg8 libpng12-0 libgif4 libexif12 libswscale2 libavcodec53
4. add the package patch => not necessary when using wheezy release 2014 or later
sudo apt-get install patch
5. go to home directory
cd ~
6. create two temporary directories for further files
mkdir logitechmediaserver
7. switch to directory ~/logitechmediaserver
cd ~/logitechmediaserver
8. obtain the following files
wget http://raspberry.fahrnet.de/logitechmediaserver/lms-rpi-raspbian.tar.gz
wget http://raspberry.fahrnet.de/logitechmediaserver/logitechmediaserver_7.8.0_all.deb
wget http://raspberry.fahrnet.de/logitechmediaserver/logitechmediaserver_7.8.0_all.deb
9. install the mediaserver
sudo dpkg -i logitechmediaserver_7.8.0_all.deb
this will take a while so stay patient
should you encounter an error like "dpg: error processing " use "... dpkg -i -force-overwrite ..." instead
10. Stop the mediaserver for the moment, until all other fixes have been applied
sudo service logitechmediaserver stop
11. unzip the tar-ball container
tar -xf lms-rpi-raspbian.tar.gz
12. move some files, create some sym links (ln -s) and refresh dynamic linkers bindings
sudo cp [-R] arm-linux-gnueabihf-thread-multi-64int /usr/share/squeezeboxserver/CPAN/arch/5.14/
The -R option might be necessary in case you get a "cp: omitting directory ..."-message (which menas, that the target directory is non-empty)
sudo cp libmediascan.so.0.0.0 libfaad.so.2.0.0 /usr/local/lib
sudo cp /usr/share/squeezeboxserver/Bin/arm-linux/faad /usr/share/squeezeboxserver/Bin/arm-linux/faad.old
sudo cp faad /usr/share/squeezeboxserver/Bin/arm-linux
sudo ln -s /usr/local/lib/libmediascan.so.0.0.0 /usr/local/lib/libmediascan.so
sudo ln -s /usr/local/lib/libmediascan.so.0.0.0 /usr/local/lib/libmediascan.so.0
sudo ln -s /usr/local/lib/libfaad.so.2.0.0 /usr/local/lib/libfaad.so
sudo ln -s /usr/local/lib/libfaad.so.2.0.0 /usr/local/lib/libfaad.so.2
sudo ldconfig
13. fix some permissions
sudo chown -R squeezeboxserver:nogroup /usr/share/squeezeboxserver/
14. create folder for playlist and change permissions
cd /usr/share/squeezeboxserver
sudo mkdir playlists
sudo chown -R squeezeboxserver:nogroup playlists/
sudo mkdir playlists
sudo chown -R squeezeboxserver:nogroup playlists/
15. start mediaserver
sudo service logitechmediaserver start
AUX:
* start|stop the Logitech Media Server
sudo service logitechmediaserver start|stop
Installing and setting up Squeezelite player ↑
This turtorial is based on http://www.gerrelt.nl/RaspberryPi/wordpress/tutorial-installing-squeezelite-player-on-raspbian/ and has been adjusted to match with current developments1. go to home directory
cd ~
2. create two temporary directories for further files
mkdir squeezelite
3. switch to directory ~/squeezelite
cd ~/squeezelite
4. obtain the following files
wget http://raspberry.fahrnet.de/squeezelite/squeezelite-armv6hf
wget http://raspberry.fahrnet.de/squeezelite/squeezelitehf.sh
wget http://raspberry.fahrnet.de/squeezelite/squeezelite_settings.sh
wget http://raspberry.fahrnet.de/squeezelite/squeezelitehf.sh
wget http://raspberry.fahrnet.de/squeezelite/squeezelite_settings.sh
5. copy the binary to the correct directory and make executable
sudo cp squeezelite-armv6hf /usr/bin
sudo chmod a+x /usr/bin/squeezelite-armv6hf
sudo chmod a+x /usr/bin/squeezelite-armv6hf
6. copy the squeezelite settings file to the correct directory and make
executable
sudo cp squeezelite_settings.sh /usr/local/bin
sudo chmod a+x /usr/local/bin/squeezelite_settings.sh
sudo chmod a+x /usr/local/bin/squeezelite_settings.sh
7. copy the squeezelite config file to the correct directory and make
executable
sudo cp squeezelitehf.sh /etc/init.d/squeezelite
sudo chmod a+x /etc/init.d/squeezelite
sudo chmod a+x /etc/init.d/squeezelite
8. setup integrated audio/ dedicated audio card according to description
9. modify the squeeze player configuration with the audio settings
sudo nano /usr/local/bin/squeezelite_settings.sh
If you setup the player on the same device like your media server, please enable the line saying SB_SERVER_IP="$SL_IP_ADDRESS" by remove the commenting "#".
If you install the player as a stand alone (satellite) implementation, please enable the line saying SL_ALSA_PARAMS="80" by removing the commenting "#". This will give some improvement and reduce interruptions.
10. finally make squeezelite start on power on
sudo update-rc.d squeezelite defaults
AUX:
* List the available audio devices for the squeezelite player
sudo /usr/bin/squeezelite-armv6hf -l
* start|stop|update the squeezelite player
sudo /etc/init.d/squeezelite start|stop|update
Controlling the audio system ↑
Your installation can be controlled in two ways. The one is based on an ordinary browser web application.Access the media server via http://<IP address of master device>:9000
You will be faced with the Logitech Media Server control panel.
The second option - for Android - is based on a native application called Squeezer. You find that app from the Google Playstore. After installation you will simply have to enter the IP address of the master
device
Implementation prototype ↑
The implementation prototype focuses on the combination raspberry pi and audioclass D-amplifier.
After figuring our, that the D-amp (see for the D-amp project) was running pretty smartly in its test environment I connected the raspberry pi...and than came the problems.
The raspberry pi org-website mentions, that with the release A+/B+ the audio output capabilities had been improved - unfortunately, I cannot share this impression. The integrated audio output delivers crappy audio quality. When directly connected to the AV-3.5mm header one gets lots of noise added to the audio signal (I had measured a -60dB noise floor).
I than connected my "least" cost USB-audio adapter which is based on a C-media USB-audio chip (some 5EUR). And guess what, audio is so much better already - but still some way off HiFi. Not in terms of noise floor, that is so much better.
The point of concern is the audible pi processor and interface activity: e.g. whenever WLAN communication happens, whenever the processor is dealing with some requests (e.g. launching the Logitech Media Server website through a browser) there are clicks and humms on the audio channel. Even if audio is muted, the activities get through.
First thoughts about power supply decoupling didn't improve the situation. I tried all paths so far and even pimped the C-Media USB-audio stick. No luck at all.
I should mention, that I'm driving the whole implementation from a 35W switch mode power supply (SMPS) at 15V - it's a Meanwell device which does create some audible noise when operated at low loads. As soon as I drive the raspberry from it (with a 5V DC/DC converter daisy-chained) the noise is gone and I can drive the D-amp from it in parallel. And because the pi will run 247 I'm not concerned about the low load noise of the SMPS at the moment.
Regarding the audio issues, I'm not giving in yet: there is still room for improving here and there. The next steps will be to build an isolation pre-amplifier to separate the audio-channel. And further filtering options have not yet been tried either.
Results will follow next.
One final remark on the combination pi + C-Media USB-audio stick: I still own a revision A pi. Adding a USB-hub, WLAN stick and the C-Media stick connected to a HiFi system is giving an acceptable audio experience! So, if you intend to build your internet radio and media server combi for you existing home entertainment system you might be fine with that combination! Try it - material comes at some 40EUR, the installation takes some 1 to 2 hours depending on your Linux experience. And the solution leaves incredible room for further development under your control.
Implementation: Doing the piNOS system ↑
It's been a while since I started this whole thing and I'm writing this in Q3 2016, almost two years since the last utterings were posted on this.Meanwhile, the implementation of the system sketched in the intro above is in operation for more than half a year now - successfully, if I may add so.
As pointed out during the proto phase - and some other enthusiast out there - power supply is the crutial point for a "clean" operation. The next two chapters will show you, how I did set up everything and which stuff is needed to get there.
The piNOS Master ↑
In retrospective setting up the piNOS Master was probably the most trivial part of the whole system to do.The master device is holding the media server and a player. For me, the master is located close to my ordinary stereo amp and is located in a pretty much hidden location, i.e. design of enclosure was not so important.
My player connects wirelessly to the local network and also holds my audio MP3 collection on a USB stick - but that's optional and not further description will follow in here.
The Material
- 1x raspberry pi version A+
- 1x MicroSDHC-Card 4GB
- 1x LOGILINK WL0084E (seems to be no longer available; see for NOTE)
- 1x rasbian wheezy dating to December 2014
- 1x LOGILINK USB 4-port hub, internal, active (e.g. Pollin 721 663)
- 1x LOGILINK USB 2.0 5.1-Audiocontroller (e.g. Polllin 720 945)
- 1x plug-in power supply, 5V d.c., minimum 2A with barrel jack
- 1x barrel socket, chassis mount
Refer to the comments on how to setup WLAN in the above chapters; there is lots of info also out there in the web on which WLAN stick is supported - you will have to do own research.
The mechanics
The raspberry just fits in the casing of the internal USB hub. The USB hub's host port was soldered directly to the USB port of the pi but leaving out the 5V signal. The barrel socket was installed in the side wall of the enclosure and DC wiring run to the pi's and the USB hub's power inputs.
Last step is to plug the USB devices (audio and WLAN adapter) into the USB ports of the hub.
When SD is readily prepared with the Linux image, insert the SD card and close the housing. You are now ready to power on your piNOS master.
Software setup
All software setup was done according to above descriptions.
Image footage
The following images may give some impression on how the above fits together in a mechanical way:
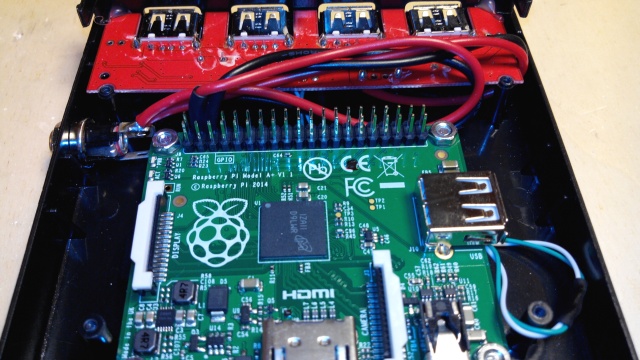
Above: electrical wiring; note, that power supply is separated at the barrel jack. USB only connects through DP/DN (green and white wire).
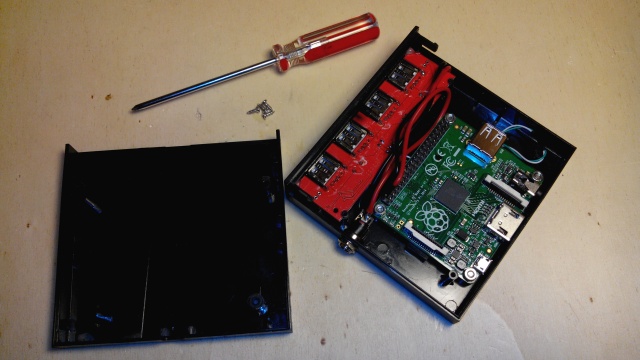
Above: before closing the box, remember to insert the micro SD card.
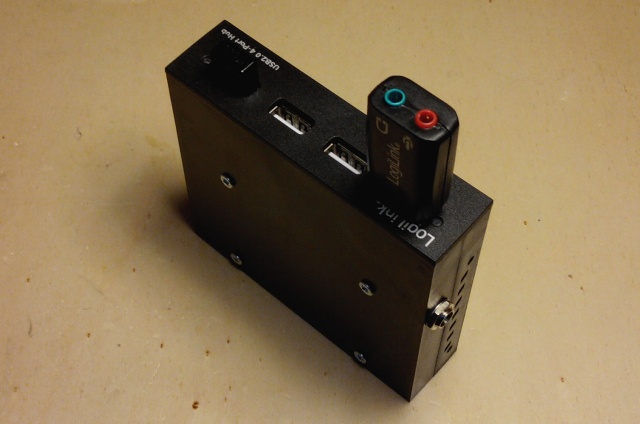
Above: enclosure of the hub closed, pi included and fixed with screws, barrel jack mounted in the side wall. USB sticks (audio, WLAN) plugged in.
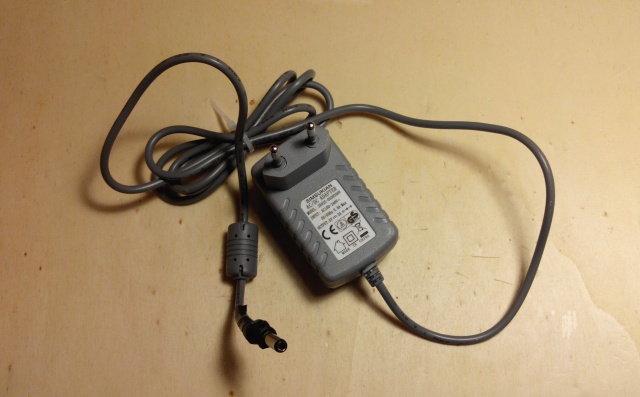
Above: power supply; sufficient to also power at least one USB stick
The piNOS Satellite ↑
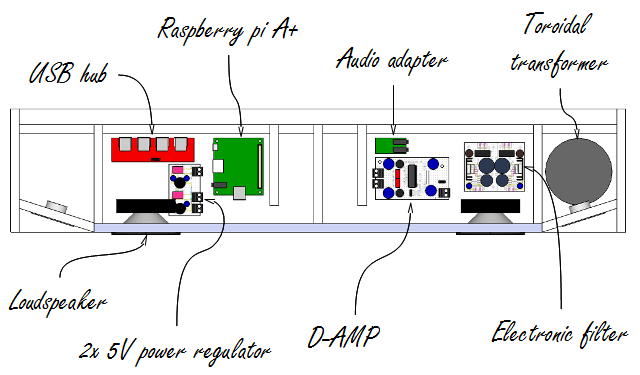
In comparison to the Master device, this one tunred out to be the biggest part of the project to solve and build...and to write (yet to come).The modules overview
The following image shows the modules which make the piNOS Satellite.
The Material
The material setup on the very basic level is equivalent to the piNOS master:
- 1x raspberry pi version A+
- 1x MicroSDHC-Card 4GB
- 1x LOGILINK WL0084E (seems to be no longer available; see for NOTE)
- 1x rasbian wheezy dating to December 2014
- 1x LOGILINK USB 4-port hub, internal, active (e.g. Pollin 721 663)
- 1x LOGILINK USB 2.0 5.1-Audiocontroller (e.g. Polllin 720 945)
Refer to the comments on how to setup WLAN in the above chapters; there is lots of info also out there in the web on which WLAN stick is supported - you will have to do own research.
In addition, I used further material as I created a complete stand alone stereo thing:
- various cuts of MDF sheet 10mm (details to follow)
- 1x toroidal transformer, 2x15VA, 1A each
- 1x Class D Amplifier board (see for "Class D Amplifier" project)
- 1x power supply board, 2x 5V (description to come)
- 1x electronic filter board (description to come)
- 2x loudspeakers, type mid-range driver, 30W sine, ca. 100mm
- 2x loudspeakers, type tweeter, 30W sine, ca. 50mm
- some wiring material
- 1x USB socket, chassis mount
- some various screws
- 2x frequency crossovers (suitable for the speakers)
- 1x EURO plug power cord
To make the enclosure look like something I made us of the following:
- some clear furniture lacquer
- some black satin spray paint
- frame dowels (for cover frame of loudspeakers, VISATION)
- some acoustic speaker cloth (check out http://www.akustikstoff.com)
My bill of material turned out to total to about 130EUR - with a potential of cost savings at around 15EUR to 20EUR.
The mechanics
I designed the enclosure of the piNOS Satellite based on the existing pair of loud speakers. For that I love to use the one of the many tools from google: sketch up.
The box during design phase looked like that:

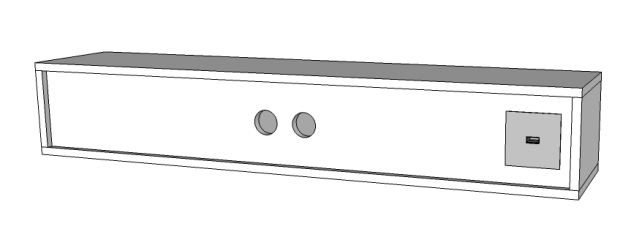
Above: front and rear view without the cover frame.
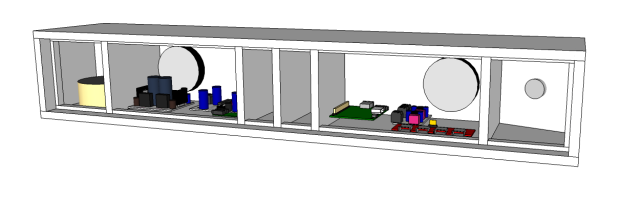
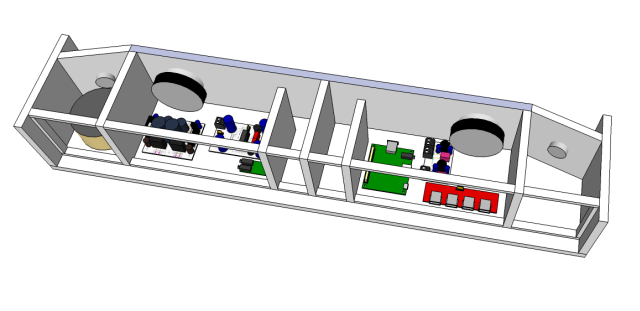
Above: 3D CAD based collision analysis and placement study on where to put which electronic board. Also check and determine the dimensions based on the loud-speakers.
Software setup
Software setup is almost equivalent to the above description BUT the installation of the Logitech MEdia Server is NOT done - why: there is only one media server in the system that that is provided through the piNOS Master device already.
Image footage
And now some real images - bringing the piNOS satellite to life:
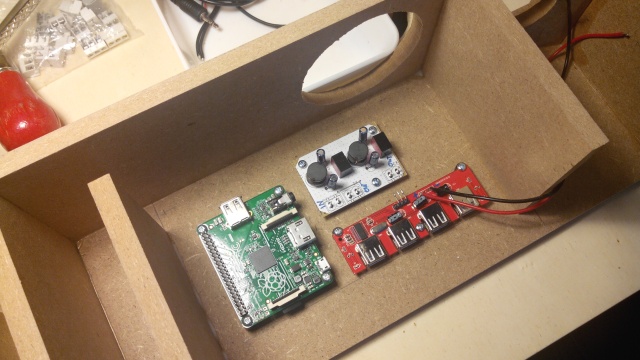
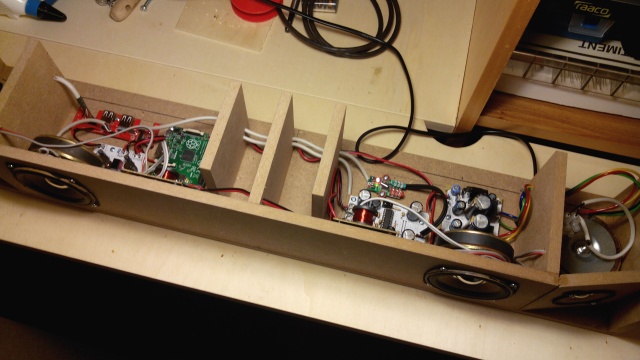
Above: the raspberry pi, USB hub and dual 5V power regulator.
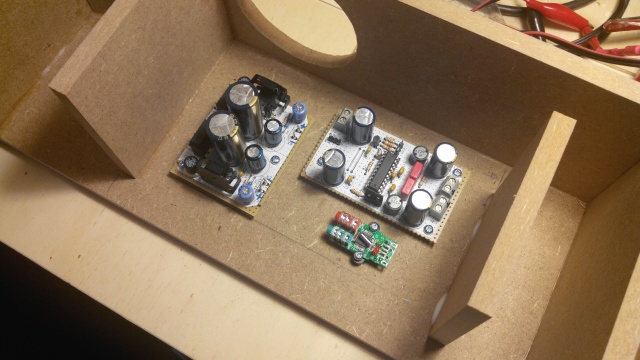
Above: the digial amplifier, electronic filter and audio adapter.
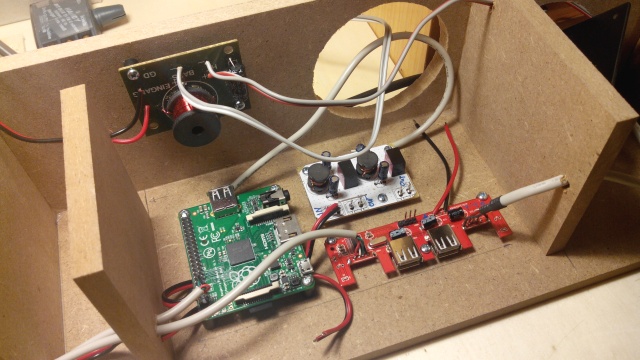

Above: first wiring brought into place, frequency crossovers assembled to front.
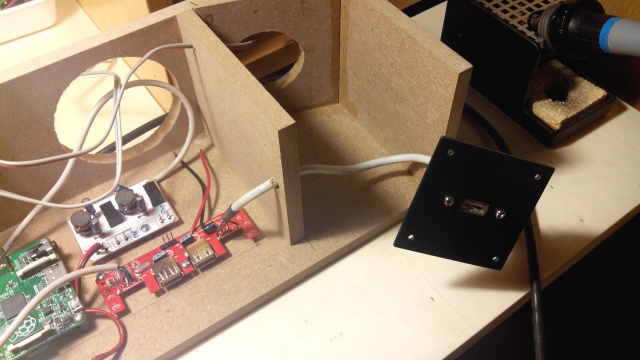
Above: the USB socket has it's own chassis mount
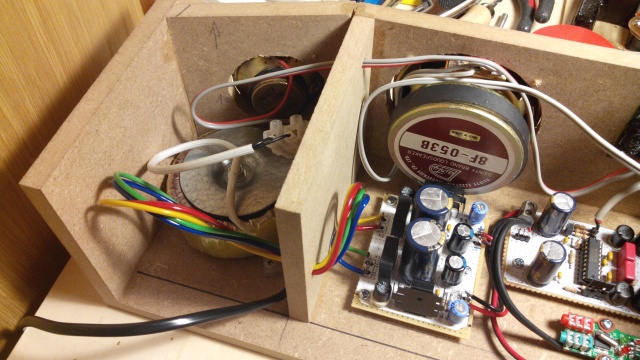
Above: the toroidal transformer is mounted behind the right channel tweeter.
Above: the first test, speakers are assembled.
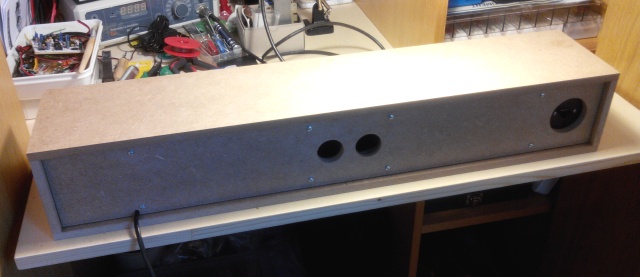
Above: rear cover assembled.
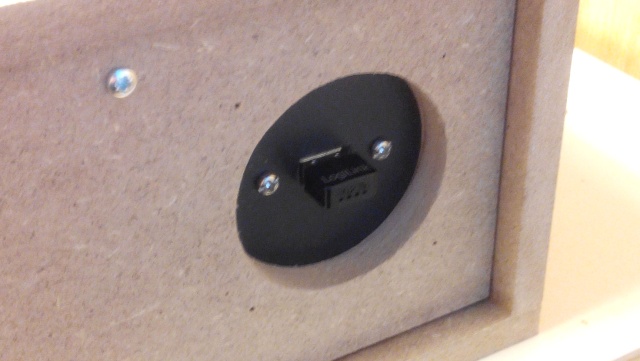
Above: USB socket in operation.
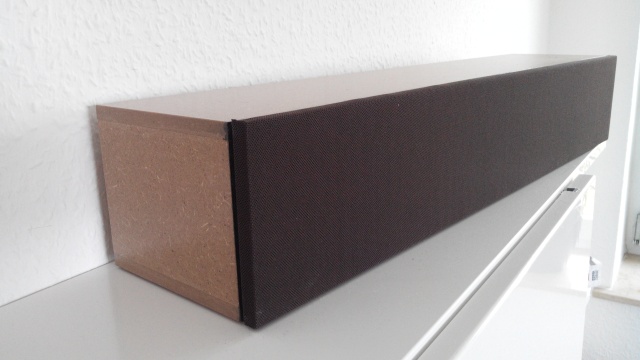
Above: piNOS satellite in operation with front cover and acoustic speaker cloth.